
The Beginners Guide to Using the Pen Tool In Adobe Illustrator
For those of you who are newer to Illustrator, you may have played around with the pen tool or at least know what it does, but you might still have no idea how to use it. I’ll be the first to admit that the pen tool has a higher learning curve than most of the Illustrator tools. It’s pretty unintuitive at first and takes some serious getting used to – and therefore, it does require some practice. Luckily you don’t need to figure it out for yourself because I’m here to teach you the basics!

What Does the Pen Tool Do?
The pen tool is probably the most powerful tool in the entire program. It allows you to draw custom vector objects with precision and flexibility (learn what the heck a vector object is here). This is the tool I use to create custom icons, infographics, logos, and any other digital illustration.
Here are a few examples of things I’ve used the pen tool for:
You can see that they range from super simple to really detailed. The pen tool works for all kinds of illustrations!
Blogging Icons

Logo Mark

Digital Illustration – Self Portrait

Related Post –>> The First 5 Tools you Should Learn in Adobe Illustrator
Pen Tool Vocab
Before we get into how to use the pen tool, let’s talk vocabulary quick. There are a few words we’ll use to describe the pen tool that you should know before we get too deep into things.
Path
A path is Illustrator language for a line. You’ll use the pen tool to create paths that will form your intended lines or shapes.
Stroke
The stroke is the thickness and/or color of the path. Path’s don’t have to have a stroke if you don’t want them to, but it’s always an option and can be changed in the stroke panel.
Anchor Point
An anchor point is a point that connects two sections of a path that shows a change in direction – i.e. a corner or a curve. Anchor points can be manipulated, moved, reshaped and deleted in order to edit the lines that make up a shape.
Handles
Every anchor creating a curve has handles. These handles can be dragged and stretched to manipulate the curve. They can also be adjusted after they’re already created, giving you tons of flexibility when designing and editing a shape or line.

Pen Tool Basics
Alright, it’s time to start drawing! Before we begin though, I want to reiterate that you don’t actually have to be good at drawing in order to use the pen tool. In fact, it’s a great tool to use if you want to trace other images, so literally, no artistic skills are required!
Geometric Shapes
Let’s start by creating geometric shapes. With the pen tool selected, click once on your workspace. You’ll see you’ve created your first anchor point. Now if you move your cursor around the screen you’ll see there is a line connecting your cursor to the first anchor point you just created that will follow it around the page. Once you’ve decided where you want your next anchor point placed, click again on your workspace which will create a second anchor point. Continue to do this until you want to complete your shape, which you can do by clicking back on the first anchor point you created. You’ll notice that when you click this first anchor that a little circle will appear next to your pen tool cursor. This is another indication that you’re closing the path to complete a shape.
Note that if you want to create a line at a perfect 0, 45, or 90-degree angle, you can hold down the shift key while you’re dragging your cursor around the screen.
If you want to create a line instead of a closed shape, press the V key on your keyboard, or click on the selection tool in your toolbar which will deselect the pen tool and finish your line without creating a full shape.

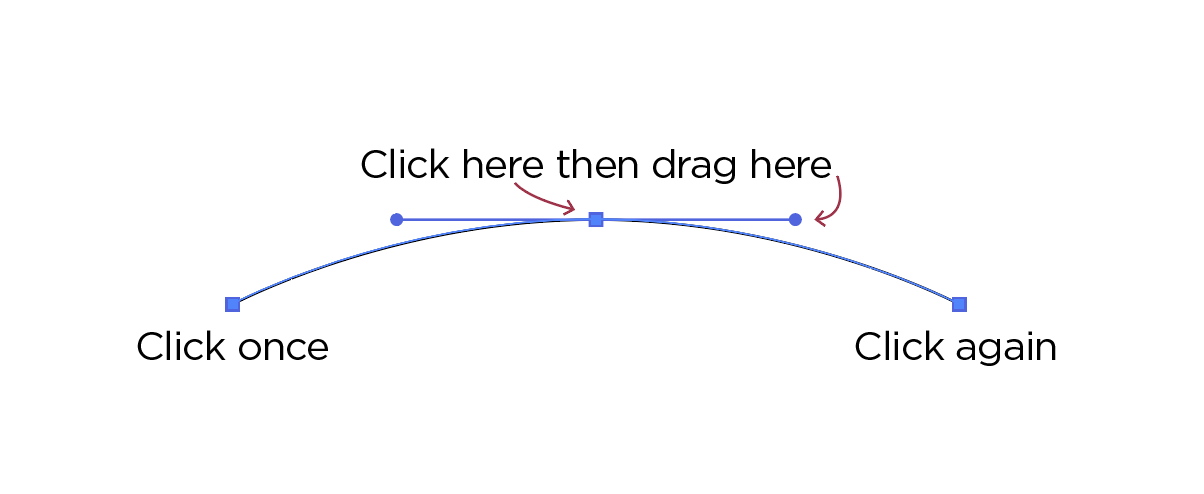
Basic Curves
Now let’s start adding curves to your shapes! Start your shape like normal by clicking once on your workspace for a starting anchor point. Now, click to create your second anchor point but before you release your mouse, drag your cursor in any direction to create a curve. You’ll notice that once you drag your mouse, handlebars will extend from your point which will create a curve in your line segment. Once you have the curve you’re hoping for, release your mouse. Keep clicking and dragging new points to create new curves and shapes in order to get a feel for how these work. mastering these curves takes practice and they make a lot more sense the more you use them.
Create a Shape Using Both Curves and Straight Lines
You’ve probably noticed that when you create a curved line, the path that you create with the next anchor point continues the curvature from that first line segment. This creates a smoother curve that carries on throughout the shape. However, if you want your next line segment to be a perfectly straight line without continuing the curve from the previous line segment, all you have to do before making your next anchor point is to click once more on the most recent anchor point. This will disable the handlebars that were creating curves for the upcoming line segment.


Editing Anchor Points
Last but not least, let’s learn how to edit shapes you’ve created. Obviously, the selection tool (the black arrow icon), will select and move around the entire object. However, if you use the direct selection tool (the white arrow icon), then you can select individual anchor points and edit the existing points and their handles. Cool, huh? It's super handy for easily editing shapes.
Try dragging around some of your anchor points and changing some of the curves using the direct selection tool.
And that’s all there is to it! I swear it makes more sense the more you play around with it, so keep with it! The key is to not get frustrated. Learn a little bit at a time and you’ll quickly get better and better – I promise! This tool alone will seriously advance your graphic design skills and take you to another level, so don’t give up!
Related Post –>> The Complete Guide to Adobe Illustrator Tools pt. 1


