
The Complete Guide to Adobe Illustrator Tools – Pt. 2
Good news! You made it through Part 1 of The Complete Guide to Adobe Illustrator Tools, and now you’re even more excited to get a run down of the last half of the Adobe Illustrator toolbar!
Welcome, everyone, to part 2!


While I would agree that the majority of the more practical, everyday Adobe Illustrator tools are in the top half of the toolbar (and covered in this post right here), the tools in the bottom half of the toolbar tend to be super powerful, and sometimes a bit more technical. So although these tools may not be ones you'll use all the time, they'll be tools that will be super helpful when you do need them!
It’s always helpful to know that these tools are available for those random times where you’re like “dang, do I really have to do all of _______ from scratch?” and then you’ll think to yourself “No! Thank God for Mariah’s Complete Guide to Adobe Illustrator Tools because I remember now that there's a tool that does that exact task!”
And then you’ll be happy.
So let’s be happy and read about the last half Adobe Illustrator tools, shall we?

Width Tool (Shift+W)
This tool only works on lines, not shapes. It allows you to click on areas of a line and make the stroke thicker or thinner.
- Warp Tool (Shift+R)
The warp tool works on both shapes and lines and creates warped indents into your vector drawings.
The amount you click, hold and drag will adjust the strength or depth of the indents.
- Twirl Tool
The twirl tool distorts shapes by creating a swirl within them. This tool only works on shapes and not lines, and the shape you want to twirl must be selected before you select the actual tool itself.
To use, just click and hold on the shape you want twirled – and voila!
- Pucker Tool
The pucker tool creates weird, pointed divots in your shape.
Again, the longer you hold down the tool on the shape and the more you click and drag the tool over the shape, the more prominent these features become. This tool works on both shapes and lines.
- Bloat Tool
This tool also works on both shapes and lines, and in contrast to the pucker tool, it bloats the shape, adding extra bumps to the outside of your shapes or lines.
- Scallop Tool
The scallop tool works on both shapes and lines, and it makes both indents and outward bumps, depending on which area of the shape you place the tool. This tool adds 3 little peaks and valleys to your shape or line every time you click. The intensity of these bumps increases the more you click and drag.
- Crystalize Tool
The crystalize tool looks similar to the scallop tool, but with stronger peaks and shallower valleys. It also works on both shapes and lines and can be increased by clicking and dragging.
- Wrinkle Tool
This tool makes your shape or line wavy, adding uneven bumps and squiggles into your paths.

Free Transform Tool (E)
This tool essentially lets you resize your shape in all ways possible.
When you select a shape to transform, a second little toolbar will appear in the upper left hand corner, floating next to your main toolbar. Here you can select Constrain, Free Transform, Perspective Distort, or Free distort. They all are obviously ways to transform your object but are best understood by just playing around with them to see how they work.


Shape Builder Tool (Shift+M)
The shape builder tool allows you to easily combine multiple, overlapping shapes in order to create one large, combined shape.
Once all of the shapes selected, select the shape builder tool and click and drag a line between every shape you want to combine. Once you release your mouse, your new shape will be created!
- Live Paint Bucket (K)
The live paint bucket allows you to fill shapes quickly and easily with color or patterns. The one important step to this process, however, is to make sure that the object(s) you want to be filled is selected first.
The cool thing about this tool is that you can fill sections of shapes that are separated by individual lines. For example, if you had a circle with a big line going through the middle of it, you could fill each side of that circle, even though that line isn’t actually connected to the shape itself. Cool huh?!
- Live Paint Selection Tool (Shift+L)
This tool allows you to select individual segments from your live paint area, and change their attributes (color, line weight, etc.).
This tool makes more sense when you play around with it, or here's a video tutorial for you to watch and get a better understand of both the live paint bucket and live paint selection tool.

Perspective Grid Tool (Shift+P)
This tool is sort of confusing to use at first, but it can be really helpful in making perspective drawings. The perspective grid allows you to make your drawing look 3D by giving them depth and spatial awareness.
To use this tool, first select the tool itself, which will make a grid appear on your artboard.
Using the cube in the upper left-hand corner, select which side of your grid you want an object to snap to. Then, select that object and drag it onto the grid, anywhere you want. Continue this step until all of your objects are on the perspective grid and look as if they are going back into space.
- Perspective Selection Tool (Shift+V)
The perspective selection tool allows you to edit and change around the perspective grid that appears on your artboard. Select the three points that appear on the bottom of the grid, and slide them around to adjust the grid.
To get out of the perspective grid altogether, click on the x in the corner of the cube pop-up using this tool.

Mesh Tool (U)
This is another highly advanced tool in Illustrator that can be extremely powerful if used correctly. This tool allows you to select certain points within a specific section of your shape to add another color. The two colors will create a gradient in-between them, acting as highlights, shading, and natural color progression. This is how extremely advanced digital artists make realistic digital drawings. They have a bajillion of these points with a bajillion different colors.
Use this tool by clicking on different parts of your shape, which then creates a point in the middle of your shape with a line connecting it to each side, horizontally and vertically. Use the direct selection tool to select this point and then change the color by changing the color swatch. Continue with this process until you have the desired gradient shading throughout your shape.

Gradient Tool (G)
The gradient tool creates either linear or radial gradients within a shape or line. The actual tool allows you to click and drag within your shape to specify where you want your gradient to start and end, and how large the spread in-between is. It also allows you to choose the angle by hand, rather than by choosing specific degrees.
In order to change the colors and edit these variables more specifically, however, you need to open the gradient window in the workspace panel on the right-hand side of your workspace. Here you can choose which colors to start and end with, add colors in between, adjust the spread, decide whether it’s a radial or linear gradient and what angle and direction it goes in.

Eyedropper Tool (I)
The eyedropper tool allows you to pick colors from other shapes, lines, objects or images so you can use that same color in other parts of your design. All you have to do is click the eyedropper tool on the areas of your artboard with the particular color you want to be selected.
- Measure Tool
The measure tool allows you to click and drag between two different areas of your workspace in order to measure the distance between the two points. This distance will then show up in the pop-up window for you to reference. This can actually be a super useful tool, so don’t forget about it!

Blend Tool (W)
This tool allows you to take two different colored objects and create a gradient in-between them by blending the two objects together.
Use this tool by first selecting both objects and then selecting the blend tool. Once the tool is selected click on the first object and then the second which will create your blend!

Symbol Sprayer Tool (Shift+S)
To use the symbol sprayer tool, you have to first open the symbol panel and select what symbol you want to be sprayed. You can do this by either clicking on the spade shape in the toolbar on the right, or by going to Window > Symbols. Now, with the symbol sprayer selected, click and drag it around on your workspace to spray the symbols onto your artboard.
- Symbol Shifter Tool
This tool allows you to move around symbols that have already been sprayed, by clicking and dragging the shifter around.
- Symbol Scruncher Tool
The scruncher tool scrunches the symbols in towards the center (essentially doing the opposite of the shifter tool).
- Symbol Sizer Tool
This tool allows you to resize individual symbols after they have already been sprayed.
- Symbol Spinner Tool
The symbol spinner allows you to rotate individual or multiple symbols at once.
- Symbol Stainer Tool
This tool allows you to recolor individual symbols. Make sure you select a fill color first, otherwise this tool won’t actually do anything.
- Symbol Screener Tool
This tool changes the opacity of individual symbols, making them lighter and lighter each time you click on them.
- Symbol Styler Tool
This tool allows you to style your symbols more specifically by first using the Graphic Styles panel. Open this panel by going to Window > Graphic Styles. Here you can select a graphic style or create your own. Once you’ve selected a style, use the symbol styler and click on individual symbols or areas of symbols to change their appearance.
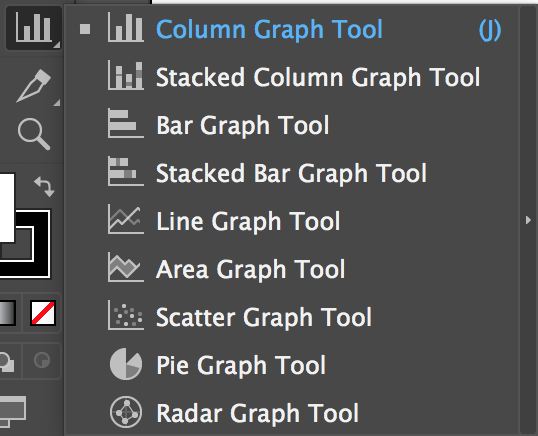
Column Graph Tool (J)
This tool, along with all of the other graphing tools nested beneath it, allows you to easily make graphs within Illustrator. I actually can’t tell you how many times I’ve hand drawn graphs from scratch in Illustrator before I realized this was an actual tool. But once I found it, it became a lifesaver! You have the opportunity to build it within Illustrator OR you can import data from an excel spreadsheet. Awesome right?
The column graph is your typical lineup of columns which correspond to values indicated by the Y axis.
This tool can be somewhat in-depth and could probably take up its own entire blog post (which I may write one of these days!). Until then, here is someone else’s blog post, explaining how to use this tool fully.
- Stacked Column Graph Tool
This graph looks similar to the column graph, but the columns are segmented within itself, outlining more data from within that particular segment.
- Bar Graph Tool
A bar graph is a column graph flipped horizontally instead of vertically, with the values of the bars aligning with the x-axis instead of the y-axis.
- Stacked Bar Graph Tool
This is a bar graph but includes segmented versions of each individual bar, to indicate more data than a typical bar graph otherwise would.
- Line Graph Tool
A line graph uses points on the graph which are connected by a line.
- Area Graph Tool
An area graph is similar in structure to a line graph but instead has shaded areas to include broader values of information.
- Scatter Graph Tool
A scatter graph is made up of several points, scattered across the graph.
- Pie Graph Tool
This is a classic pie chart where a circle is divided up into sections to a complete 100%.
- Radar Graph Tool
A radar graph is similar to an area graph, but instead is round and can, therefore, have more variables than just two or four.

Artboard Tool (Shift+O)
One of my favorite features of Illustrator is that you can have multiple artboards within one document. By using the artboard tool, you can add a new artboard or resize your current arboards. You can also copy existing artboards by clicking and dragging it, while holding down the command key.

Slice Tool (Shift+K)
The slice tool allows you to separate your artboard into squared off sections for you to save out individually. That way, if you have a large image that you need to piece down into sections, you can click and drag the slice tool to divide up the area(s) you want as individual files.
Here's a tutorial that might help.
- Slice Selection Tool
The slice selection tool allows you to change, move, edit and resize the slices you’ve already made with the slice tool.

Hand Tool (H)
The hand tool gives you another option to move around the screen. Just click and drag with the hand tool selected, and you will be able to view different areas of your workspace.
- Print Tiling Tool
This tool is to help you print full images that are larger than the paper you’re printing on. In order to print your entire image, you may need tile your printing onto multiple sheets of paper. This tool allows you to specify more accurately where the first page in the tiling process starts. Otherwise, Illustrator will set this up for you automatically when you turn on tile printing in the print window. Either way, you can adjust the tiling further within the print window by dragging your artwork between multiple sheets of paper.
If you’re using this tool and you feel like nothing is happening on your artboard, make sure you go to View > Show Print Tiling.
In order for this feature to actually work when you try printing it, make sure “File Full Pages” is selected from the Scaling drop down menu underneath Options.

Zoom Tool (Z)
The zoom tool zooms in and out of your workspace. You can zoom in by either clicking or clicking and dragging, and zoom out by either clicking and dragging the magnifying glass to the upper left-hand corner, or by holding down the Option key while you click or click and drag.
You can also zoom in and out by holding down Cmd + (zoom in) or Cmd - (zoom out) for Mac users.
Alright now that you’re the queen/king of Adobe Illustrator tools, it’s time to download your free cheat sheet so you NEVER FORGET THEM!


